Sunday, 24 July 2016

Hack your Friends Computer by doing this Amazing Tricks with Notepad

Notepad is a generic and well-known text editor which comes in all versions of Windows Operating System. Many peoples think it allows you to open and read plain text files but, this is not true, it can do many impressive things which will make your day and from this thing, you can scare your friends or neighbours. Today, In this post I will show you the Best Notepad tricks which you can do and scare your friends and neighbours.

Note: The following tricks will not harm your's computer. However if you want to get out of this tricks, just delete the notepad file and just restart your's computer. Your PC's will usually work as earlier was.

The Amazing tricks which can do with Notepad are:


1. Continuously Toggle On-Off the Caps Lock Button.

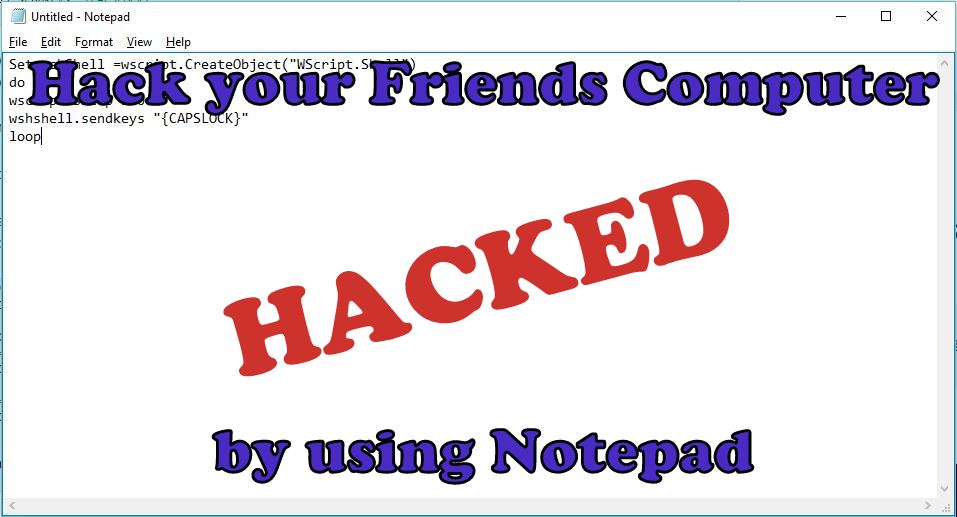
This trick will be continuously Toggling On and Off the Caps Lock Button. It will irritate your friends as hell.
  • Open the Notepad by typing notepad in a Search box or by pressing Win+R together and type Notepad in the dialogue box.
  • Copy the below code in the Notepad.
Set wshShell =wscript.CreateObject("WScript.Shell")
do
wscript.sleep 150
wshshell.sendkeys "{CAPSLOCK}"
loop
  • Now, Save the File with a .vbs extension rather than the Standard .txt extension. For eg: caps.vbs.

  • Now, Send this file to your friends and neighbours and ask them to open it.(Note: Do Not open on your Computer either it will affect you).

2. Continuously Open the DVD/CD Drive.


This Trick is my Favourite trick, In this thing, CD/DVD Drive will continuously open.
  • Open the Notepad by typing notepad in a Search box or by pressing Win+R together and type Notepad in the dialogue box.
  • Copy the below code in the Notepad.
Set oWMP = CreateObject("WMPlayer.OCX.7")
Set colCDROMs = oWMP.cdromCollection
do
if colCDROMs.Count >= 1 then
For i = 0 to colCDROMs.Count - 1
colCDROMs.Item(i).Eject
Next
For i = 0 to colCDROMs.Count - 1
colCDROMs.Item(i).Eject
Next
End If
wscript.sleep 4000
loop
  • Now, Save the File with a .vbs extension rather than the Standard .txt extension. For eg: cd.vbs.

  • Now, Send this file to your friends and neighbours and ask them to open it.(Note: Do Not open on your Computer either it will affect you).

3. Fool your's friend by hacking the friends keyboard to make it type something you want continuously.


By this trick, you can make your friend fool by hacking their keyboard.
  • Open the Notepad by typing notepad in a Search box or by pressing Win+R together and type Notepad in the dialogue box.
  • Copy the below code in the Notepad.
Set wshShell = wscript.CreateObject("WScript.Shell")
do
wscript.sleep 100
wshshell.sendkeys “I Hacked your PC.”
loop 
  • Changed the "I Hacked your PC" text and put something else you want.
  • Now, Save the File with a .vbs extension rather than the Standard .txt extension. For eg: hack.vbs.

  • Now, Send this file to your friends and neighbours and ask them to open it.(Note: Do Not open on your Computer either it will affect you).

4. Shut Down the Computer by showing Error message you want.


This trick will shut down your friend's computer and before shutting down, it will show your friends an error message like you want
  • Open the Notepad by typing notepad in a Search box or by pressing Win+R together and type Notepad in the dialogue box.
  • Copy the below code in the Notepad.
@echo off
msg * You fell for it again
shutdown -c “You are too stupid to open this” -s
  • Changed the "You are too stupid to open this" text and put something else you want.
  • Now, Save the File with a .vbs extension rather than the Standard .txt extension. For eg: shut.vbs.

  • Now, Send this file to your friends and neighbours and ask them to open it.(Note: Do Not open on your Computer either it will affect you).
If you like this post, then do share or if you have any query or any problem related to this post then comment it below.

Saturday, 23 July 2016

How to Hide your Drive in Windows by using CMD

Windows Command Prompt is a very Powerful tool to perform some tasks. It is usually used to do a task without using a third-party tool. Today in this post we are going to share another interesting topic on Comand Prompt. Today we are learning how to hide any drive in Windows by using CMD. You can also Hide drive by using a free tool such as DriveHide, but we are not using any third party software to do it same.

How to Hide any Drive in Windows by using Command Prompt?

To know how to hide any drive then, follow the steps given below.


Step 1: Type CMD in search area Box or in Run Dialog Box. Open CMD as run as Administrator.

Step 2: Type Diskpart in the CMD and Hit enter key, then Click YES if you are prompted with User Account Control (UAC) Dialog-box.


Step 3: After that, you will be prompted with new Command Prompt. Type List Volume and hit the enter key, and all the drives will be listed below.

Step 4: Now, Select the drive that you want to hide. Type Select Volume E or Select Volume 3 and hit the Enter Key (here, E is the Drive Letter, and 3 is the Volume Number).

Step 5: Now to Hiding a Drive, type Remove Letter E (Here E is the drive letter that you want to Hide).

Your Drive is Hide Now; you can close the CMD by typing exit command. Now check the drive on your PC.

Before Hiding
After Hiding

How to display the Hidden Drive by using CMD?

To know how to show Hidden Drive then, follow the steps given below.

Step 1: Type CMD in search area Box or in Run Dialog Box. Open CMD as run as Administrator.

Step 2: Type Diskpart in the CMD and Hit enter key, then Click YES if you are prompted with User Account Control (UAC) Dialog-box.

Step 3: After that, you will be prompted with new Command Prompt. Type List Volume and hit the enter key, and all the drives will be listed below.

Step 4: Now, Select the drive that you want to display. Type Select Volume E or Select Volume 3 and hit the Enter Key (here, E is the Drive Letter, and 3 is the Volume Number).

Step 5: Type Assign Letter E and hit the Enter Key to display the Drive.


Now your Drive will be displayed in Explorer.

If you like this post, then do share or If you have any query or any problem then comment it below.


Sunday, 3 July 2016

How to Create a Virtual Wi-Fi Hotspot by using CMD

In Today's World Internet Connectivity has become one of the most important things that we need. It would be more helpful when we get a fast internet connection, and it would be the most helpful when we get a Wi-Fi Connectivity. From Windows 7 towards Microsoft includes the virtual Wi-Fi hotspot features. Today I will show you how to create a Virtual Wi-Fi Hotspot on your Laptop by using CMD and without using any third party utility. It will support on Windows 7, Windows 8 and Windows 10.

To know how to create a Virtual Wi-Fi Hotspot on Windows then follow some steps:


Step 1: Open CMD and run as Administrator.

Step 2: Check the Driver is it install or not?

netsh wlan show drivers
If Hosted network supported will be yes, then you can further continue the step


Step 3: To Create a Virtual Wi-Fi

netsh wlan set hostednetwork mode=allow ssid= mywifi key= password
 You can change the SSID name and key
For, e.g.,
ssid= MyRouter
key=123456789

Step 4: To Start a Wi-Fi

Make sure that your Wi-Fi is ONN.
netsh wlan start hostednetwork

Step 5: To Access the Internet

Open Network and Sharing Center >> Ethernet >> Properties >> Click on Sharing Tab >>  Tick on all the Checkboxes and select the Home networking connection from the Drop Down List (Make sure that your Home networking connection is same as your Wi-Fi connection).

Step 6: To Stop a Wi-Fi

netsh wlan stop hostednetwork

Create a Shortcut on Desktop

Create a shortcut to Start Wi-Fi

        Right click on Desktop >> Shortcut
import: netsh wlan start hostednetwork >> next
import: Start Wi-Fi >> Finish

Create a shortcut to Stop Wi-Fi

Right click on Desktop >> shortcut
import: netsh wlan stop hostednetwork >> next
import: Stop Wi-Fi >> Finish

Now you can easily ONN and OFF Wi-Fi.


Here is a Video of it

If you like this post, then do share or if you have any query then comment it below.

Sunday, 12 June 2016

How to Hide file inside an image by using cmd


There are many software which hides files inside the images or hides text inside a picture. Today, we are learning how to hide any file inside an image using cmd. This is a very amazing trick which you don't know about it. You can also do little bit of prank with your friends by using this amazing trick

To see How to Hide Text/Message in an Image by using Steganography go to this link.


In this blog post, we are creating an image file which looks like a standard image but in this image file, you will see hidden files inside it. If you extract that image, then you will get a hidden file. No one can guess that the file is inside an image, you can make fool to anybody.


To know how to hide file inside an image you need to follow some steps:


Step 1: To know clearly the steps, at first create a folder on the desktop named it "hidingfiles" and then put some files which you want to hide.


Step 2: In the next step put one image in that folder as I had done, name it as simple as that with no space because in cmd it will give you a syntax error.(In the image I typed "images" Remember that file must be in JPG format).


Step 3: Compress the file which you want to hide using WinRAR or ZIP. (In the image I want to hide a song, so I compress the songs using ZIP). Once you created an RAR file named the file as simple as that with no space because in cmd it will give you a syntax error.(In the image I typed "hidenfile").


Step 4: Open CMD and run as Administrator as you open the CMD hit enter and locate your folder like if your folder in D drive type d: and if your folder in E drive type e: and hit enter. Then locate the folder by using cd command like "cd folder name" (In this image my folder is in desktop, so I copy the path of that folder and paste it on the cmd).


If you save folder in another drive then check this Screenshots


Line 1: cd C:\Users\Vinay\Desktop\Hidingfiles
Line 2: copy /b images.jpg + hidenfiles.zip images.jpg
press Enter.


Now your original file is copied into your images. Check the file size of your images to know it is copied or not. The image file will be bigger than the previous one. Now your file is hidden inside and image. You can now move the image to any location on your computer or your Pendrive. 

To know how to Extract File from image follow some steps


Step 1: Right Click on an image, open with WinRAR Archiver or 7zFM.exe.


Step 2: Click on Extract and OK (Now your hidden file is extracted).


You can also hide the larger size of a file inside an image.


If you like this post, do share or comment it below and If you have any query or any problem, then please comment it below or contact us on a contact us page.

Wednesday, 6 January 2016

Make your pendrive bootable by two way

There is always two way to solve any problem easy way or hard way. Here also to make Pendrive bootable there is a two-way easy way and the hard way. Using Software is the easiest way and Using CMD is the hardest way to make Pendrive bootable.

To create a Pendrive Bootable, you need an ISO image of that Operating System 

1. By using Software

     By using software is the easiest way to make your Pendrive bootable.

How to make USB drive Bootable?

To make USB drive bootable follow some steps
  • Click here to Download Rufus application.
  • Click and Run the app as administrator.
  • Once your app is open, Plugin your USB drive like Pendrive into your PC or laptop.
  • Then in Format options Check "Create a bootable USB disk using" and select "ISO image" and then select ISO image of any Windows operating system that you want to install.

  • Click on "Start" and wait for processing, it will take a time to create Bootable USB drive.
  • Click on close option.
You have now a Bootable USB drive, you can now easily install any operating system by this bootable USB drive that you just created.


2. By using CMD

      By using CMD is the hardest way to make a USB drive bootable, but the advantage of this type is that you can make USB drive bootable without any software.

How to make USB drive Bootable?

To make USB drive bootable follow some steps.

  • Plug in your USB drives to your PC or laptops.
  • Open Command prompt as an administrator.
  • By typing"diskpart" in your Command Prompt, it will open disk management utility.
  • After that, To display the connected disks that are available on your system type "list disk" in your Command Prompt and hit enter.
  • Select disk which you want to make bootable, to do that type "select disk x", where x is the drive no or drive letter of your USB drive and hit enter.
  • To delete all data from the USB drive type "clean" in Command Prompt and hit enter. All the data of your USB drive will be deleted by this command.
  • Now, you will need to create a bootable partition on the USB drive, to do that type "create part pri" in Command Prompt and hit enter.

  • After creating a partition, you have to select that partition that you just created, Type "select part 1" in Command Prompt  to select a partition and hit enter.
  • Type "active" in Command Prompt and hit enter to active current partition.
  • You can format partition by any way by NTFS or FAT32, to format the partition by NTFS type"format fs=ntfs quick" in Command prompt and hit enter or to format the partition by FAT32 type "format fs=fat32 quick" in Command prompt and hit enter.
  • Type "exit" and hit enter.
  • Finally, Copy all the files of your Windows operating system that you want to install or ISO image of Windows and paste it inside your USB drive.
Finally, Your Pendrive or USB drive  are booted without any software.

How to use Bootable Pendrive?

Plug in your USB drive to your PC or Laptops and make sure your BIOS is all setup and now you should be able to easily Install Windows Operating System using Bootable USB drive that you just created.

I recommend that go to easy way to make Pendrive Bootable, it is easy to use. 
If you have any problem or any query comment it below or do share if you thought this post is helpful.

Saturday, 12 December 2015

Lists of Router's Common IP address

What is IP address ?
IP address stands for INTERNET PROTOCOL. An IP address is written as four numbers separated by dot (.). Router's uses IP address that start with 192.168.X.X. The Most common IP address is 192.168.1.1 and 192.168.2.1.

You can also find Router's IP address from your Computer by simply open the command prompt and then type ipconfig. The next to Default Gateway is your Router IP address.


Here are some conditions, If you want to fix a relative's network issue and you need to access their WiFi Routers and you don't know their Router's IP address then you try the common IP address like 192.168.1.1 or 192.168.2.1 but some routers doesn't support common IP address. 
Here are some lists of IP address of almost all routers in the world.

Router's Brands                                        Common IP address

2Wire                                                 192.168.1.1
                                                         192.168.0.1
                                                         192.168.1.254
                                                         10.0.0.138

3Com                                                 192.168.1.1
                                                         192.168.1.10.1

Actiontec                                            192.168.1.1
                                                         192.168.0.1
                                                         192.168.2.1
                                                         192.168.254.254

Airlink                                               192.168.1.1
                                                         192.168.2.1

Airlive                                               192.168.2.1

Airties                                               192.168.2.1

Apple                                                10.0.1.1

Amped Wireless                                  192.168.3.1

Asus                                                  192.168.2.1
                                                        192.168.1.1
                                                        10.10.1.1

Aztech                                              192.168.1.1
                                                       192.168.2.1
                                                       192.168.1.254
                                                       192.168.254.254

Belkin                                              192.168.1.1
                                                       192.168.2.1
                                                       10.0.0.2
                                                       10.1.1.1

Billion                                              192.168.1.254
                                                       10.0.0.2

Buffalo                                             192.168.1.1
                                                       192.168.11.1                                                                
Cisco                                                192.168.1.1
                                                       192.168.0.30
                                                       192.168.0.50
                                                       10.0.0.1
                                                       10.0.0.2

Dell                                                   192.168.1.1

D-Link                                              192.168.1.1
                                                       192.168.0.1
                                                       192.168.0.10
                                                       192.168.0.101
                                                       192.168.0.30
                                                       192.168.0.50
                                                       192.168.1.254
                                                       192.168.15.1
                                                       192.168.254.254
                                                       10.0.0.1
                                                       10.0.0.2
                                                          10.1.1.1
                                                       10.90.90.90

Edimax                                             192.168.2.1

Eminent                                            192.168.1.1
                                                        192.168.0.1
                                                        192.168.8.1

Gigabyte                                           192.168.1.254

Hawking                                           192.168.1.200
                                                        192.168.1.254

Huawei                                              192.168.1.1
                                                         192.168.0.1
                                                         192.168.3.1
                                                         192.168.8.1
                                                         192.168.100.1
                                                         10.0.0.138

LevelOne                                            192.168.0.1
                                                          192.168.123.254

Linksys                                                192.168.1.1
                                                           192.168.0.1
                                                           192.168.1.10
                                                           192.168.0.210
                                                           192.168.1.254
                                                           192.168.1.99
                                                           192.168.15.1
                                                           192.168.16.1
                                                           192.168.2.1


Microsoft                                             192.168.2.1

Motorola                                               192.168.0.1
                                                           192.168.10.1
                                                           192.168.15.1
                                                           192.168.20.1
                                                           192.168.30.1
                                                           192.168.62.1
                                                           192.168.100.1
                                                           192.168.102.1      
                                                           192.168.1.254

MSI                                                       192.168.1.254

Netgear                                                192.168.0.1
                                                                      192.168.0.227

NetComm                                            192.168.1.1
                                                           192.168.10.50
                                                           192.168.20.1
                                                           10.0.0.138

Netopia                                                  192.168.0.1
                                                            192.168.1.254

Planet                                                     192.168.1.1
                                                            192.168.0.1
                                                            192.168.1.254

Repotec                                                 192.168.1.1
                                                            192.168.10.1
                                                            192.168.16.1
                                                            192.168.123.254

Senao                                                     192.168.0.1

Siemens                                                 192.168.1.1
                                                            192.168.0.1
                                                            192.168.1.254
                                                            192.168.2.1
                                                            192.168.254.254
                                                            10.0.0.138
                                                            10.0.0.2

Sitecom                                                  192.168.0.1
                                                            192.168.1.254
                                                            192.168.123.254
                                                            10.0.0.1

SMC Networks                                      192.168.1.1
                                                            192.168.0.1
                                                            192.168.2.1
                                                            10.0.0.1
                                                            10.1.10.1

Sonicwall                                               192.168.0.3
                                                            192.168.168.168

SpeedTouch                                           10.0.0.138
                                                            192.168.1.254

Sweex                                                    192.168.15.1
                                                            192.168.50.1
                                                            192.168.55.1
                                                            192.168.251.1

Tenda                                                     192.168.1.1
                                                            192.168.0.1

Thomson                                                192.168.0.1
                                                            192.168.1.254
                                                            192.168.100.1

TP-Link                                                 192.168.1.1
                                                            192.168.0.1
                                                            192.168.0.254

  Trendent                                              192.168.1.1
                                                            192.168.0.1
                                                            192.168.0.30
                                                            192.168.0.100
                                                            192.168.1.100
                                                            192.168.1.254
                                                            192.168.10.1
                                                            192.168.10.10
                                                            192.168.10.100
                                                            192.168.2.1
                                                            192.168.223.100
                                                            200.200.200.5

U.S.Robotics                                          192.168.1.1
                                                            192.168.2.1
                                                            192.168.123.254


Zoom                                                      192.168.1.1
                                                             192.168.2.1
                                                             192.168.4.1
                                                             192.168.10.1
                                                             192.168.1.254
                                                             10.0.0.2
                                                             10.0.0.138

ZTE                                                         192.168.1.1
                                                             192.168.0.1
                                                             192.168.100.100
                                                             192.168.1.254
                                                             192.168.2.1
                                                             192.168.2.254

Zyxel                                                       192.168.1.1
                                                             192.168.0.1
                                                             192.168.2.1
                                                             192.168.4.1
                                                             192.168.10.1
                                                             192.168.1.254
                                                             192.168.254.254
                                                             10.0.0.2
                                                             10.0.0.138

If you couldn't find your router brand in the above list or most common Default IP address are not working properly then please contact us on contact us page or you can check it from here http://setuprouter.com/ or comment it below.